all new smarter content
browsers, access all your scene files, textures, and
cache files easily.
import/reference/open any .ma .mb .obj .fbx files
you can access files from other CG Apps as well for example your blender-Houdini substance,… files, clicking on these files will
open them in their corresponding software.
the content browser will recognize your texture files and it can automatically assign one or all of them to the right channels of
your material.
batch generate thumbnails for your scene and textures.
create render volumes from your VDB files or send them to your Bifrost graph.

Add your Custom Paths:
The first thing you do when opening a content browser is to add your custom paths. You can do that by pressing the “Add Path” button.
When you press Add Path, a window will open letting you choose a directory, You can add as many paths as you need.
Each project has its own list of directories for the content browser, the list will be saved in a file name
“ContentBrowser.Mdata” located in your project. (for the default project it is located in
“mayaprojectsdefaultContentBrowser.Mdata”)
Remove Paths:
First select your path and then right click any where in directory view and choose “Remove Path”. 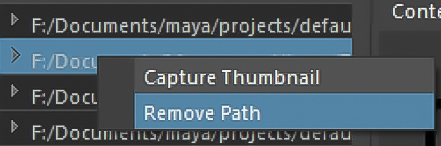
Remember that it will only remove the path that is selected, if you right click on another path and choose remove it will still remove the one that is currently selected.
You can also manually open this file and modify your list, or copy it to other projects.
an important thing to know about adding your path is to never add subdirectories of a path you have already added.

Here I added a subdirectory of a texture path I have already added to my content browser.
In the current version of the content browser if this happens you need to manually remove this path from directory lists.
open the “ContentBrowser.Mdata” file in a text editor and remove the path which causes the error and save.
Note that the last line should always be empty.

Accessing your files
Scene Files: for .mb .ma .fbx .obj files you can open/import/refrence these files . 
You can change the default behavior with these files from the three buttons on top of the browser. Right-click on any of these buttons and set them as default.
You can also right-click on any file and choose to open, import or reference the file.
Content browser is made to be a fast way to work with files. it won’t ask you any question when you click on a scene file, if it is set to import, it will import that files instantly, if it is set to open, it will open the file without any question, so I recommend that you don’t set the default behavior to Open unless you are sure about it as you may lose unsaved data.
When you have ContentBrowser and ProjectBrowser installed whenever you save your .mb .ma file it will also save a thumbnail for it.
Texture files
The content browser will recognize your texture files based on their names and when you click on one it will try to connect it to the right channel on your material.
How does it know which material should it apply the texture to?
Just go to your material tab in the attribute editor, whatever material you are looking at in Attribute Editor is the one that the content browser is applying textures to.

So let’s say your object has 2 materials, aiStandard1 and aiStandard2. You are looking at aiStanadard2 in Attribute editor and you click on a Normal Map in the Content Browser, if aiStandard2 already have a normal map connected, it will change that map to the one you selected in the Content Browser and if it doesn’t, It will create a new map and get it connected it to the normal map channel of that material for you. It will also automatically set color space of, NormalMap, Roughness, Metalic, displacement, to “raw”.
You can also right-click on a texture file and choose which channel you want to connect this map to.
The naming of the files is important for the content browser to recognize the files, while it recognizes most files, it works best with standard namings like Quixel – Substance and Textures.com where the name of the channel is at the end of the file name.
Single click auto-assign all maps
you can rightclick on any of the maps and choose “Assign to
Selected”, this will find and connect all maps and
connect them to the material for you.
Single click create material and assign all maps: if
you are using textures from Quixel or
Textures.com you probably have a preview
image of the texture, just click on the preview
image and it will create new material based on
your render engine and will also find and
connect all maps for you.

HDR and Exr Files
a fast way to test different hdr images foryour scene.
If your scene already have a dome light it will connect the file to that light and if it doesn’t it will make a dome light based on your render engine.
.exr files are also the most common file extension for displacement maps, you can right click on an .exr file and choose to set to displacement map, color and normal map.

VDB and Bob files
ContentBrowser also recognizes .vdb and .bob files.
Right-click on a VDB file and you have the option to add the cache file as a render volume (based on your render engine) assign it to the selected volume, create a Bifrost graph or add it as a file cache node to the current Bifrost graph.


Thumbnail for your files
by default the texture files don’t have a thumbnail and using their
original file as a thumbnail for the content browser have a terrible effect on overall
performance, so whenever you open a folder with some images inside, the content browser
will start making thumbnail for all the images in the root of that folder, this will happen only
once for every file.

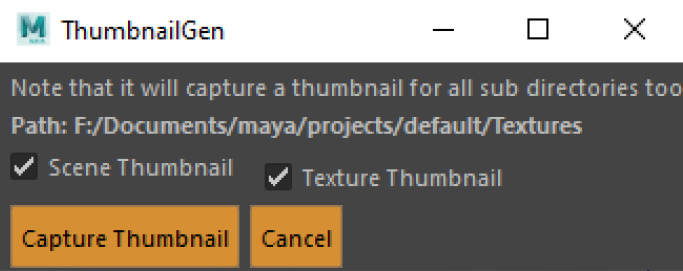
To save yourself some time and have a better performance in the content browser you can Batch Generate thumbnail for all of your texture files.
You can also batch generate thumbnails for your scene files.
Select a directory in the content browser, right-click anywhere on the directory list, and choose “Capture thumbnail”
Choose scene or texture thumbnail and hit Capture Thumbnail to start making
thumbnails for your files.
Capturing thumbnails may take some time, you can cancel it at any time, it will
continue from where it left the next time you run the process.